Swift Concurrency
async
async
- 함수 정의 뒷부분에 async를 붙이면 해당 함수는 비동기라는 것을 나타냄
- async 함수는 concurrent context 내부 즉, 다른 async 함수 내부 혹은 Task 내부에서 사용 가능
func listPhotos(inGallery name: String) async -> [String] {
    let result = await asyncFunction()
    return result
}
- 일반 함수뿐만이 아니라, read-only 프로퍼티나 생성자에도 async 사용 가능
extension UIImage {
    var thumbnail: UIImage? {
        get async {
            let size = CGSize(width: 40, height: 40)
            return await self.byPreparingThumbnail(ofSize: size)
        }
    }
}
init(userID: Int) async throws {
    let fetchedUser = try await UserManager.fetchUserData(id: userID)
    self.user = fetchedUser
}
async let
- 아래와 같은 코드는 한 번에 하나의 비동기 코드만 실행
- 비동기 코드가 실행되는 동안, 호출자는 다음 코드를 실행하기 전에 해당 코드가 완료될 때까지 기다림
func fetchOneThumbnail(withID id: String) async throws -> UIImage {
    let imageReq = imageRequest(for: id), metadataReq = metadataRequest(for: id)

    let (data, _) = try await URLSession.shared.data(for: imageReq)
    let (metadata, _) = try await URLSession.shared.data(for: metadataReq)

    guard let size = parseSize(from: metadata),
          let image = UIImage(data: data)?.byPreparingThumbnail(ofSize: size) else {
        throw ThumbnailFailedError()
    }

    return image
}
- 비동기 함수를 호출하고 주변 코드와 병렬로 실행 하는것도 가능
- 정의할 때 let 앞에 async를 작성한 다음 상수를 사용할때 await를 사용
func fetchOneThumbnail(withID id: String) async throws -> UIImage {
    let imageReq = imageRequest(for: id), metadataReq = metadataRequest(for: id)

    async let (data, _) = URLSession.shared.data(for: imageReq)
    async let (metadata, _) = URLSession.shared.data(for: metadataReq)

    guard let size = parseSize(from: try await metadata),
          let image = try await UIImage(data: data)?.byPreparingThumbnail(ofSize: size) else {
        throw ThumbnailFailedError()
    }

    return image
}
- async let을 사용하면 해당 코드는 바로 실행 되지만 대기하지는 않음
- await을 통해 실행을 기다림
func execute() async {
    // 실행을 시작하지만 대기하지는 않음
    async let one = sleepOne()
    async let two = sleepTwo()

    print("await: ", await one) // one 대기
    print("await: ", await two) // two 대기
}

func sleepOne() async -> Int {
    try? await Task.sleep(for: .seconds(1))
    print("sleepOne completed")
    return 1
}

func sleepTwo() async -> Int {
    try? await Task.sleep(for: .seconds(2))
    print("sleepTwo completed")
    return 2
}
await
await

- async 함수를 호출하기 위해 await이 필요함
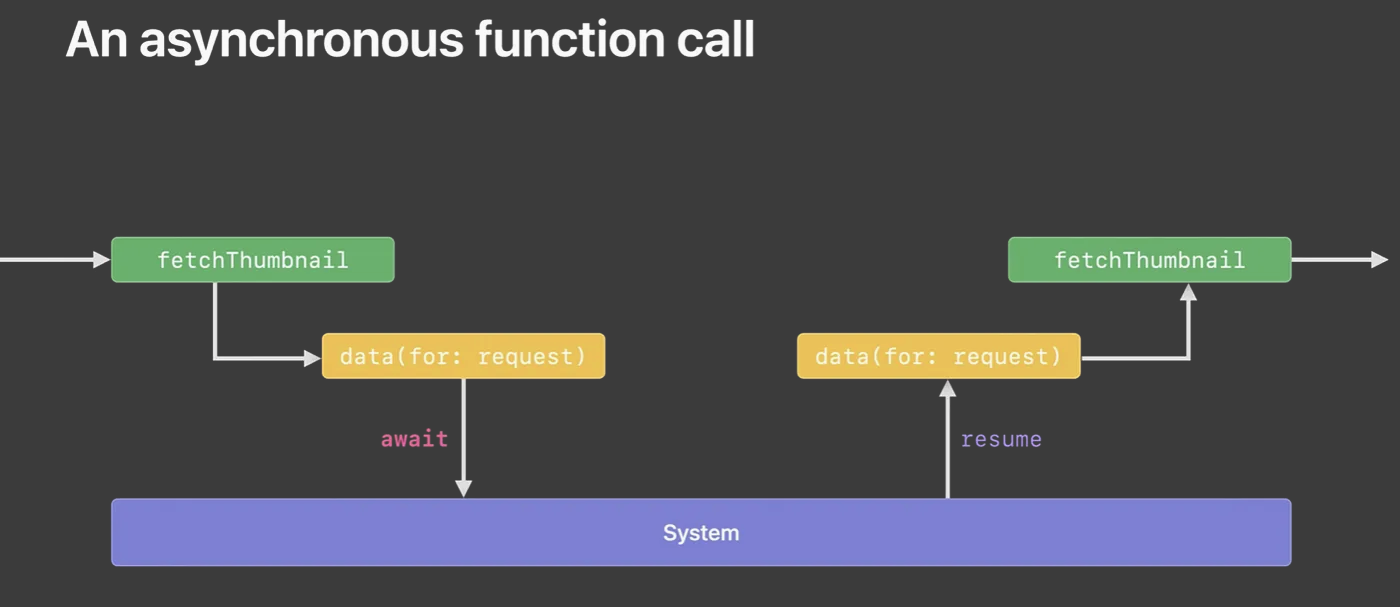
- await는 potential suspension point로 지정 된다는 것을 의미
- suspend 된다는 것은 해당 thread에 대한 control을 포기한다는 것
- 해당 코드를 돌리고 있던 thread에 대한 control은 system에게 가고, system은 해당 thread를 사용하여 다른 작업 가능
print("비동기 함수 호출 전") // Thread A에서 실행
await asyncFunction() // Thread A 제어권 시스템에게 줌
print("비동기 함수 호출 후")
- await로 인한 중단은 해당 thread에서 다른 코드의 실행을 막지 않음
- function은 suspend 되고, 다른 것들이 먼저 실행 될 수 있고 그렇기에 그 동안 앱의 상태가 크게 변할 수 있음
- thread를 차단하는 대신 control을 포기해 작업을 중지 및 재개할 수 있는 개념을 도입
print("비동기 함수 호출 전")
await asyncFunction()
print("비동기 함수 호출 후") // Thread B에서 이어서 실행
- 정리하자면, await로 async 함수를 호출하는 순간 해당 thread control 포기
- 따라서 async 작업 및 같은 블럭에 있는 다음 코드들을 바로 실행하지 못함
- thread control을 system에게 넘기면서, system에게 해당 async 작업도 schedule
- system은 다른 중요한 작업이 있다면 먼저 실행하고, 특정 thread control을 줘서 async 함수와 나머지 코드를 resume
for await
- for loop에서도 await 사용 가능
- 기본적으로 for await은 element를 순차적으로 처리함
for await item in asyncSequence {
    await processItem(item) // 각 항목이 하나씩 차례로 처리됨
}
- 하지만 taskGroup이나 async let을 사용하여 병렬적으로 처리할수 있음
await withTaskGroup(of: Void.self) { group in
    for await item in asyncSequence {
        group.addTask {
            await processItem(item)
        }
    }
}
- AsyncStream과 같은 일부 AsyncSequence 구현은 요소들을 동시에 생성함
- for await loop은 여전히 요소들이 사용 가능해지는 순서대로 하나씩 소비하지만, 병렬적으로 처리가 가능해짐
- 핵심은 for await 자체는 순차적으로 반복하지만, 필요에 따라 그 주변에 병렬 처리를 구현할 수 있다는것
task

Task
- Task는 비동기 작업 단위: A unit of asynchronous work
- 격리되어(isolated), 독립적으로(independently) 비동기 작업을 수행
- 값이 공유될 상황이 있을때는 Sendable 체킹을 통해 Task가 격리된 상태로 남아있는지 체크
Task {
    // 비동기 코드
}
- Task 안에서의 작업은 처음부터 끝까지 순차적으로 실행
- await를 만나면 작업은 몇번이고 중단될 수는 있지만, 실행 순서가 변경되지는 않음
Task {
    // 순서대로 실행되는 비동기 context
    let fish = await catchFish()
    let dinner = await cook(fish)
    await eat(dinner)
}
Task Cancellation
isCancelled는 Bool을 리턴하는 단순히 cancel 되었는지 확인하는 플래그checkCancellation()은 cancel 되었으면 CancellationError을 throw 함- 둘다 synchronous 혹은 asynchronous 코드 어디서나 사용할수 있음
if Task.isCancelled { ... }
try Task.checkCancellation()
- 부모 Task를 cancel 하면, 자식 Task는 isCancelled 플래그가 true가 될뿐 코드 실행을 멈추지는 않음
- 그래서 Task가 cancel 되어도 코드가 즉시 멈추지는 않을 수 있음
- 예를들어, 아래 코드에서 1번 지점 전에 cancel이 호출 되었다면 throw를 하고 코드가 멈출것임
- 하지만 2번 지점 이후 cancel이 호출 되었다면, 코드 실행이 그대로 진행될것임
func makeSoup(order: Order) async throws -> Soup {
    async let pot = stove.boilBroth()

    // 1
    guard !Task.isCancelled else {
        throw SoupCancellationError()
    }

    // 2
    async let choppedIngredients = chopIngredients(order.ingredients)
    async let meat = marinate(meat: .chicken)
    let soup = try await Soup(meat: meat, ingredients: choppedIngredients)
    return try await stove.cook(pot: pot, soup: soup, duration: .minutes(10))
}
Structured Task
- Task가 부모-자식 관계의 계층적 구조를 형성하는것
- 자동으로 cancel, error, completion 등이 관리됨
async let혹은TaskGroup이 이에 해당함
func downloadUserData() async throws -> (String, [String]) {
    async let profile = fetchUserProfile()
    async let friends = fetchFriendsList()

    return try await (profile, friends)
}
func downloadImages(urls: [URL]) async throws -> [Data] {
    try await withThrowingTaskGroup(of: Data.self) { group in
        var images: [Data] = []

        for url in urls {
            group.addTask {
                let (data, _) = try await URLSession.shared.data(from: url)
                return data
            }
        }

        for try await image in group {
            images.append(image)
        }

        return images
    }
}
Unstructured Task
- 명확한 계층 구조가 없거나, 단일 스코프의 제약을 벗어나는 생명주기를 가진 작업에 사용됨
- 동기 코드에서 비동기 작업을 시작해야 하거나, 한 메서드에서 시작해서 다른 메서드에서 취소해야 하는 작업에 사용함
Task혹은Task.detached가 이에 해당함
Task {
    let thumbnails = await fetchThumbnails(for: ids)
    display(thumbnails, in: cell)

    Task.detached(priority: .background) {
        writeToLocalCache(thumbnails)
    }
}
Task는 MainActor 혹은 부모 Task 등의 context 상태를 상속받아 실행됨Task.detached는 상속받는 context 없이 완전히 독립적으로 동작하는 태스크를 생성
@MainActor
func example() {
    // MainActor context를 상속 받음
    Task {
        for i in 1...10000 {
            print("In Task 1: \(i)")
        }
    }

    // MainActor context를 상속 받지 않음
    Task.detached {
        for i in 1...10000 {
            print("In Task 2: \(i)")
        }
    }
}
- 아래 코드는 Unstructured Task를 딕셔너리에 담고 있다가, 불필요해지면 취소하는 예시
@MainActor
class MyDelegate: UICollectionViewDelegate {
    var thumbnailTasks: [IndexPath: Task<Void, Never>] = [:]

    func collectionView(_ view: UICollectionView, willDisplay cell: UICollectionViewCell, forItemAt item: IndexPath) {
        let ids = getThumbnailIDs(for: item)
        thumbnailTasks[item] = Task {
            defer { thumbnailTasks[item] = nil }
            let thumbnails = await fetchThumbnails(for: ids)
            display(thumbnails, in: cell)
        }
    }

    func collectionView(_ view: UICollectionView, didEndDisplay cell: UICollectionViewCell, forItemAt item: IndexPath) {
        thumbnailTasks[item]?.cancel()
    }
}
- 아래 코드는 Detached Task를 통해 별도로 백그라운드에서 Task를 실행하는 코드
- 캐싱은 Main Thread에서 할 필요가 없고, 다른 썸네일이 fetch에 실패해도 캐싱은 안할 이유가 없음
@MainActor
class MyDelegate: UICollectionViewDelegate {
    var thumbnailTasks: [IndexPath: Task<Void, Never>] = [:]

    func collectionView(_ view: UICollectionView, willDisplay cell: UICollectionViewCell, forItemAt item: IndexPath) {
        let ids = getThumbnailIDs(for: item)
        thumbnailTasks[item] = Task {
            defer { thumbnailTasks[item] = nil }
            let thumbnails = await fetchThumbnails(for: ids)
            Task.detached(priority: .background) {
                writeToLocalCache(thumbnails)
            }
            display(thumbnails, in: cell)
        }
    }
}
TaskGroup
- TaskGroup으로 동적으로 병렬 작업을 합쳐 모든 작업이 완료되면 결과를 반환 받을 수 있음
withTaskGroup,withThrowingTaskGroup
let images = await withTaskGroup(of: UIImage.self, returning: [UIImage].self) { taskGroup in
    let photoURLs = await loadPhotoUrls()

    for photoURL in photoURLs {
        taskGroup.addTask { await downloadPhoto(url: photoURL) }
    }

    var images = [UIImage]()

    for await result in taskGroup {
        images.append(result)
    }

    return images
}
TaskGroup vs Array of Tasks
TaskGroup은 Structured Concurrency 제공- 모든 자식 작업이 완료될 때까지 그룹이 대기함
group.addTask로 생성된 자식 작업은 매우 가벼움- 메모리와 스케줄링 측면에서 효율적임
- 완료 순서대로 결과를 수집할 수 있음
for await구문으로 효율적으로 결과를 처리함- 동시 실행 작업 수를 쉽게 제한할 수 있음
withTaskGroup(of: T.self) { group in
    for t in tasks {
        group.addTask { await t }
    }
}
- Array of Tasks는 Unstructured Concurrency
- 작업들이 독립적으로 실행됨
- 모든 작업 완료를 보장하기 어려움
- 더 많은 메모리와 스케줄링 리소스를 사용함
- 결과 수집을 위한 추가 동기화 메커니즘이 필요함
- 모든 작업이 한 번에 스케줄러에 전달됨
for work in works {
    Task {
        let t = await work.work()
        await self.append(t)
    }
}
Core vs Thread vs Task
Core
- 물리적인 하드웨어 처리 장치로, CPU 내부에 있는 독립적인 연산 유닛
- 멀티코어 프로세서는 여러 개의 코어를 가지고 있어 진정한 병렬 처리가 가능
- 코어 수는 하드웨어에 의해 고정되며, 소프트웨어로 늘릴 수 없음
Thread
- 운영체제가 관리하는 실행 단위로, 프로세스 내에서 독립적으로 실행되는 흐름
- 각 스레드는 자체적인 스택, 레지스터 상태, 프로그램 카운터를 가지지만 프로세스의 메모리 공간은 공유함
- 커널 스레드는 운영체제 스케줄러가 직접 관리하며, 코어에 할당되어 실행됨
- 컨텍스트 스위칭을 통해 여러 스레드가 하나의 코어를 시분할하여 사용 가능
- 생성과 전환에 상당한 오버헤드가 있음
Task
- Swift Concurrency에서 사용하는 경량 실행 단위
- 커널이 직접 관리하지 않고, 런타임 라이브러리가 관리하는 사용자 수준의 실행 단위
- 실제 OS 스레드 위에서 협력적으로 실행되며, await 지점에서 다른 Task로 전환 가능
- 스레드보다 훨씬 적은 메모리를 사용하고 전환 비용이 낮음
- Task로 thread explosion을 방지하고 컨텍스트 스위칭를 최소화해 성능 개선 가능
Task Warning
- Concurrency를 사용하는 것은 추가적인 리소스 비용이 듬
- Concurrency의 이점이 리소스 비용을 넘어설때만 사용하는 것을 추천
- await 이전의 코드를 실행한 쓰레드가 계속해서 continuation 코드를 실행할 것이라는 보장은 없음
- 작업을 자발적으로 스케줄링에서 제외함으로써 atomic을 깨뜨림
- await를 사용하는 동안 Lock을 유지할 수 없음
- await를 지나면 쓰레드 전용 데이터가 유지되지 않음
actor
Data Race
- 여러 Task가 동시에 일을 하고 있지만 동일한 객체를 참조하기 때문에 발생
- 동일한 객체에 동시에 접근해서 crash가 나거나, 예상밖의 순서로 작업이 진행됨
Actor
- 공유되는 데이터에 접근해야 하는 여러 Task를 조정하기 위해 존재
- 데이터를 isolate 하고, 한 번에 하나의 Task만 내부 상태를 변경하도록 허용
- 동시 변경으로 인한 Data Race를 피함
- Actor는 mutable state를 shared 한다는 목적이기 때문에 class와 같은 reference 타입
actor SharedWallet {
    let name = "공유 지갑"
    var amount = 0

    init(amount: Int) {
        self.amount = amount
    }

    func spendMoney(ammount: Int) {
        self.amount -= ammount // 1
    }
}

Task {
    let wallet = SharedWallet(amount: 10000)
    let name = wallet.name // 2
    let amount = await wallet.amount // 3
    await wallet.spendMoney(ammount: 100) // 4
    await wallet.amount += 100 // 5
}
- 1: actor 내부에서 변수 접근시 await 불필요
- 2: 상수는 변경 불가능하기 때문에 actor 외부에서도 바로 접근 가능
- 3: actor 외부에서 변수 접근시 await 필요
- 4: actor 외부에서 메서드 호출시 await 필요
- 5: 컴파일 에러, actor 외부에서 actor 내부의 변수를 변경할 수 없음
MainActor
- MainActor는 main thread를 나타내는 특별한 global actor
- await이 사용되었다는 것은, 해당 thread에서 다른 코드가 실행될 수 있도록 실행 중인 함수가 중지될 수 있다는 의미
- 따라서 메인 스레드에서 한꺼번에 작업이 이뤄지길 원하는 경우에는 관련 함수를 run block에 그룹화 해야함
- 그래야 해당 함수들 사이에는 일시 중단 없이 호출이 실행되도록 할 수 있음
await MainActor.run {
    // UI 관련 코드 1
}
await MainActor.run {
    // UI 관련 코드 2
}
await MainActor.run {
    // UI 관련 코드 1
    // UI 관련 코드 2
}
- Main Thread에서 실행되어야 하는 코드를 @MainActor 표시로 타입, 함수, 클로저, 프로퍼티 등에 적용 가능
- class, struct, enum 같은 타입에 붙으면, 내부에 있는 모든 property와 method가 isolated 되고 main thread에서 동작
@MainActor
class Example {
    var value: Int = 0

    func updateValue() {
        print("Running on main thread? \(Thread.isMainThread)")
        value += 1
    }
}
actor SomeActor {
    let id = UUID().uuidString
    @MainActor var myProperty: String

    init(_ myProperty: String) {
        self.myProperty = myProperty
    }

    @MainActor func changeMyProperty(to newValue: String) {
        self.myProperty = newValue
    }

    func changePropertyToName() {
        Task { @MainActor in
            myProperty = "hohyeon"
        }
    }
}
Sendable
- Sendable 프로토콜을 준수하는 타입은 동시성 컨텍스트 간에 값을 공유할 수 있음
- Value 타입은 Sendable, Actor 타입도 Sendable
- Immutable한 데이터만 있는 Class는 Sendable
- 내부적으로 synchronized 되어있는 Class는 Sendable
- @Sendable로 표시된 함수도 actor 간에 공유 가능
- 클로저도 마찬가지로 @Sendable 할 수 있음
// Sendable Class
final class User: Sendable {
    let id: Int
    let name: String

    init(id: Int, name: String) {
        self.id = id
        self.name = name
    }
}

// Sendable closure
actor Calculator {
    func calculate(operation: @Sendable () -> Int) -> Int {
        return operation()
    }
}
others
Continuation
- async한 메서드를 호출할 때 thread의 제어권을 포기한 상태를 suspended 상태라고 함
- suspended 상태 이후 다시 제어권을 돌려 받았을때 어디서부터 실행할지를 아는것이 필요함
- suspension point에서 실행하는데 필요한 context를 heap에 저장해 제어권을 돌려받았을때 어디서 실행할지 알수있음
- 이것을 continuation이라고 부름

withCheckedContinuation,withCheckedThrowingContinuation- 클로저 기반의 completion handler 비동기 처리를 async/await 형태로 바꿀때 자주 사용
- continuation이 두 번 이상 resume을 호출하면 안됨
- resume을 호출하지 않아도 Task가 무기한 일시 중단된 상태로 유지
- 즉, resume은 정확히 한번 호출되어야 함
func fetch(completion: @escaping ([String]) -> Void) {
    let url = URL(string: "https://www.hohyeonmoon.com")!

    URLSession.shared.dataTask(with: url) { data, _, _ in
        if let data {
            if let something = try? JSONDecoder().decode([String].self, from: data) {
                completion(something)
                return
            }
        }
        completion([])
    }.resume()
}

func fetch() async -> [String] {
    await withCheckedContinuation { continuation in
        fetch { something in
            continuation.resume(returning: something)
        }
    }
}

let something = await fetch()
- delegate 패턴에서 async를 사용할때도
withCheckedContinuation을 사용
class ViewController: UIViewController {
    private var activeContinuation: CheckedContinuation<[Post], Error>?

    func sharedPostsFromPeer() async throws -> [Post] {
        try await withCheckedThrowingContinuation { continuation in
            self.activeContinuation = continuation
            self.peerManager.syncSharedPosts()
        }
    }
}

extension ViewController: PeerSyncDelegate {
    func peerManager(_ manager: PeerManager, received posts: [Post]) {
        self.activeContinuation?.resume(returning: posts)
        self.activeContinuation = nil // 중복 resume 호출 방지
    }

    func peerManager(_ manager: PeerManager, hadError error: Error) {
        self.activeContinuation?.resume(throwing: error)
        self.activeContinuation = nil // 중복 resume 호출 방지
    }
}
AsyncStream
- Swift Concurrency를 데이터 스트림 형태에서 사용할수 있게해줌
- yield로 스트림에 element를 제공하고, finish로 정상적으로 스트림을 종료
AsyncStream,AsyncThrowingStream
class QuakeMonitor {
    var quakeHandler: (Quake) -> Void
    func startMonitoring()
    func stopMonitoring()
}

let quakes = AsyncStream(Quake.self) { continuation in
    let monitor = QuakeMonitor()

    monitor.quakeHandler = { quake in
        continuation.yield(quake)
    }

    continuation.onTermination = { termination in
        switch termination {
        case .finished:
            print("finished")
        case .cancelled:
            print("cancelled")
        }

        monitor.stopMonitoring()
    }

    monitor.startMonitoring()
}

let significantQuakes = quakes.filter { quake in
    quake.magnitude > 3
}

for await quake in significantQuakes {
    ...
}
참고
- Meet async/await in Swift
- Explore structured concurrency in Swift
- Swift concurrency: Behind the scenes
- Updating an App to Use Swift Concurrency
- AsyncStream Apple document
- TaskGroup vs Array of Tasks
- Difference between a Thread and a Task
- Task Groups in Swift explained
- Convert closures into async functions
- Swift Concurrency에 대해서
- Swift Concurrency 성능 조사
- Swift AsyncStream/AsyncThrowingStream
- 차근차근 시작하는 GCD
- Swift async/await
- Swift Actor 뿌시기
